Live Debug Data Plotting in Visual Basic
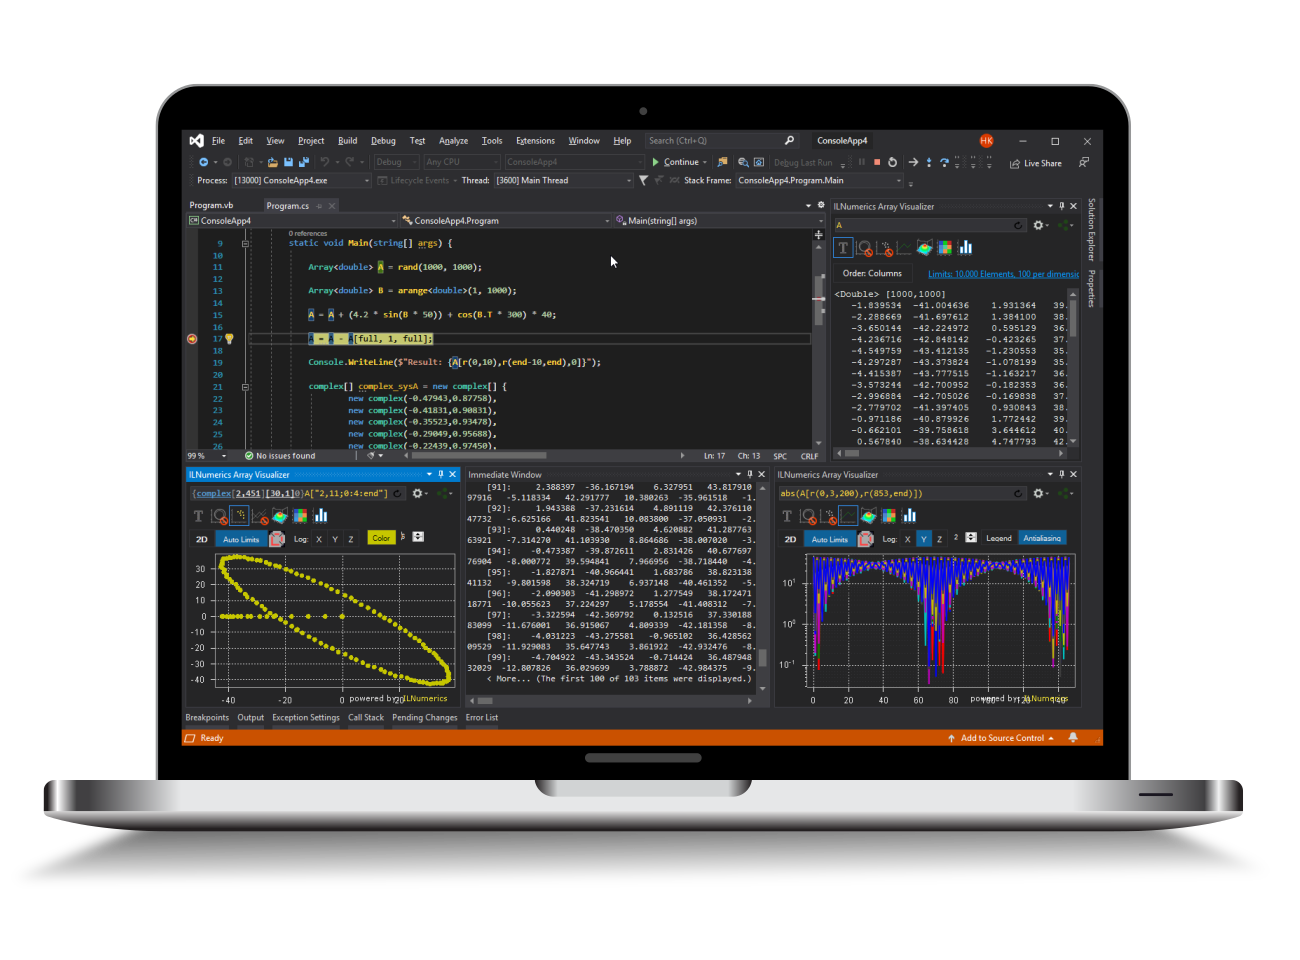
ILNumerics Array Visualizer is an interactive, graphical debug tool for Visual Studio. During your debug session it connects to the Visual Studio debug engine and allows immediate insight into the data of your Visual Basic program. Arbitrary array data are plotted in various, interactive chart styles: as 1D and 2D line plots, scatter plots, bar plots, as 3D surface plots, and images. Easily describe the data via arbitrary expressions. Export data in a large number of external formats, including charts, HDF5 and Microsoft Excel. Follow your data with each debug step to quickly find bugs in the algorithm.
Visualizing Debug Data - 3 Simple Steps
1. When halted in your Visual Studio debug session go to the Visual Studio View menu:
VIEW -> Other Windows -> ILNumerics Array Visualizer
2. Enter the name of an array variable from your current debug scope into the expression text area of the Array Visualizer.
3. (Optional) Choose a plotting type from the list of available 2D and 3D plots.
4. (Optional) Apply further configurations to the plot.

Plotting Array Expressions in Visual Basic
Let's start by creating a very simple Visual Basic program:
Enter a debug session, stopping the execution at a breakpoint at the statement: 'A(4) = 20', line 10 (see below)! Start the ILNumerics Array Visualizer (if not done yet). The content of the variable A at the current statement is plotted by entering A into the Array Visualizer and pressing [Enter].

Here, the content is shown as text. Click on the line plot tab  at the top of the Array Visualizer tool window to show the data as line plot. You may modify the plot by selecting a different color, adjusting the line width etc. Note how the plot is linked to the variable: pressing F10 modifies A in the next statement. The change is immediately reflected by the plot:

Get Interactive
No matter, how you interact with the data in your debug session – changes will show up immediately in the array visualizer. One might set the 3rd element of A to the value 10 in the immediate window. See how the plot follows:

Ad-hoc visualizations of any vector data are possible by entering the code to create an array with the desired elements. In order to plot some values, taken from constants, variables, other arrays or functions:
New Double() { 1.2, A(3)+1, -Math.Tan(-2.223), r, B }

Supported Array Expressions in Visual Basic
In Visual Basic the ILNumerics Array Visualizer plots arbitrary expressions yielding the following array types:
- ILNumerics arrays: Array<T>, InArray<T>, ...
- 1D System.Array: Double(), Single(), Integer(), ILNumerics.complex(), ...
- Multidimensional System.Array: Double(,,), Integer(,), Byte(,,,), ILNumerics.complex(,), ...
- On-the-fly expressions evaluating to arrays: New Integer() {1,2,3,4,5} , fft(A)[r(0,end/2-1)], ...
- Arrays of structs ('records', user defined types)
All primitve numeric element types are supported:
| Floating point data types | Double | Single |
ILNumerics .complex |
ILNumerics .fcomplex |
||||
| Integral data types | Integer | Long | Short | SByte | UInteger | ULong | UShort | Byte |
| Character | Char |
Expressions entered in the Array Visualizer are evaluated in the context of the current debug stack frame. Your program must be halted in debug mode. Any valid Visual Basic code can be used as expression for the Array Visualizer, including variables, function calls etc.
Users of the ILNumerics Computing Engine can utilize any function from ILMath, from any referenced toolbox, combining several Array<T> variables, subarray expressions, accessing HDF5 data, and so on...
N-D Array Plotting Example
Matrices and higher dimensional arrays are handled in the same way:
Plot Types
Next to the text output, the 2D matrix C can be visualized by help of the following chart types:
| XY-Line Plot | Scatter Plot | Rows Plot |
 |
 |
 |
| Surface Plot | ImageSC Plot | Bar Plot |
 |
 |
 |
The row of iconized buttons at the top of the the Array Visualizer tool window represents individual plot types. Each plot provides a different view of the data. The Array Visualizer enables / disables individual plot types according to the array currently described by the array expression. When holding the mouse over an individual plot type button a tool tip appears, giving hints about the required array shape for the plot type. Read more
Advanced Visual Basic Data Visualization
Using Array Descriptors in Visual Basic
In the previous sections of this manual the data to plot were represented as full dense array variables. However, many technical applications implement more complex data storage scenarios. In most situations the interesting data are stored within recordsets, or structs of more complex data types.
Example: potential data type definition for storing 3D measurement data.
Here, 5 data elements of type Double are stored for each measurement: the X,Y, and Z coordinates as the position of the measurement and two arbitrary data values. Data1 and Data2 might be used to store the actual value measured or some error range / confidence information computed for the measurement or any other useful value.
In real world applications data structures like this are very popular. Working with them can be cumbersome, though, especially if the number of measurements grows high. Developers often enough end up inspecting individual fields of every single measurement, utilizing data tips in Visual Studio: 
Now, the ILNumerics Array Visualizer simplifies things significantly:

Just enter the path to the interesting field into the expression text box and hit Enter. Here, we point to the 'Data1' member of the struct at element index 0: 'myData(0).Data1' . Choose a useful plotting type and inspect all Data1 values from all Measurements at once! In this example we selected 'Line Plot' as output type. Just as well, we could make use of bar plots or others...
Combining multiple members
With a little help of our flexible array descriptor syntax we can create even more useful plots. For example, multiple data members can be combined into a single plot result. Let's modify the expression and just write: 'myData' and press Enter:

The Array Visualizer recognizes that we wish to plot data from the struct array myData. It activated the array descriptor mode and filled in the lenght of the array (9) and the strides of individual elements for us (40b). Now, since struct arrays can have arbitrary member types, we are asked to enter a valid type for visualizing the data. Enter 'Double' as element type:

The vector '0,1,2,0,...' was created by the Array Visualizer from the values of the first struct member X of all array elements. We can enhance the plot by adding Y and Z. In order to archieve this, recall the memory layout of the struct array:

By now we have extracted the vector of X values from the memory by picking the first Double from each struct object, skipping over 40 bytes to get to the next X value. We may see this extraction as creating the following matrix row:
Extracting more data than X corresponds to having more rows in the matrix:
This requires only a slight modification to the array descriptor:

This time and by using the scattered data plot the 3D positions of the measurements are made clearly visible. (We show the X-Y positions only here, since we look straight onto the X-Y plane. If there were any useful Z values we would visualize them by switching to the 3D view and rotating the plot with the mouse.)
Another useful view is given by the bar plot type. It shows the X, Y and Z coordinates as separated groups:

Now we could easily add both, Data1 and Data2 as new rows to the matrix - this is left to the reader as exercise.
Member Selection - Working with Offsets
Any member from the struct can be selected for plotting individually. In order to plot Z and both data members only we must jump over preceding elements and start the extraction matrix at the first (in terms of memory address) Z member. In our example this corresponds to the starting address of the Z member of the 1st struct array element, 0x02DE28B4. This address is 2 x 8 = 16 bytes higher than the start of the array itself. We can use the array descriptor to enter the offset manually. Note, that we have intentionally left the lenght of the first dimension unchanged. Z, Data1 and Data2 will form 3 rows of our result. Hence, the first dimension length remains 3:

Luckily, we don't have to compute these offsets manually. We can leave this to the Array Visualizer! Let's start all over by clearing the Array Visualizer expression window (CTRL-A or CTRL+Enter) and entering the direct path to the first Z member:

->[Enter]

Note how the offset of 16 bytes has been figured out automatically. From here, it is easy to add the additional dimension to get the exact same plotting result as in the example above:

Replacing the Memory Window in Visual Basic
You may have observed that the Visual Studio Debug Memory Window does not always work as expected with Visual Basic projects. Older versions of Visual Studio did not support memory display in Visual Basic at all. While more recent versions have improved they still expose some problems to this regard. The Array Visualizer is able to display any accessible memory in any shape / type one may possibly needs. Therefore, it can be used as a nice replacement for the Debug Memory Tool Window.
Just select SByte or Byte as element type and provide the dimensions and strides as needed. The text view gives a nicely formatted overview table of the addressed memory region. Here, we visualize the bytes of a 3 x 4 x 5 Int32[,,] array in a table of 30 x 8 bytes:

The Text output gives:
Or as a surface plot:

Read more about array descriptors in the array descriptor tutorial (mixed languages).